Types of Japanese knives
Sashimi:Originally, Sashimi meant a Kansai District-type sashimi knife. At present, however, it is popular nationwide. In the Kansai District, the knife is also called “syoubu. ”
Tako-Sashimi: Originally, Tako-Sashimi meant a Kanto District-type sashimi knife. Recently, however, users of this type are decreasing because the style is losing ground to yanagiha knives.
Fugu-Sashimi: The knife is used for cutting fish, such as fugu blowfish, paper-thin, and it is thicker and not as wide as a sashimi knife. The knife is also called the “tessa knife. ”
Deba: The knives are used for cleaning and cutting fish and birds, but they are divided into many types depending on thickness and length. They are widely used for many applications.
Kamagata-Usuba: The knives are the Kansai District type of vegetable-cutting knives, and the small types are used for chamfering vegetables.
Usuba: The knives are the Kanto District type of vegetable-cutting knives. They are the single-edge type in general, but some are double-edged.
Hamo-Kiri: The knives are used for cutting bony fish such as sharp-toothed eel.
Unagi-Saki Knife: The knives are the Kanto District type of knives for cutting eel. The different types consist of the Osaka, Kyoto, Nagoya types of knives.
How to sharpen knives
Blade Sharpening

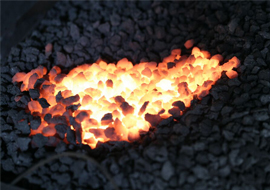
[1] First soak the sharpening stone. Most stones should be soaked between 10-20 mins. Specialized stones will require varying soak times or none at all.
[2] Grip the blade firmly (see picture on right). With the blade facing you and using your right hand, hold the handle of the blade comfortably, yet firmly. With your left hand, use 2-3 fingers on the blade approximately 2-3cm above the blade edge.
Press down to find the angle of the cutting edge on the blade so that it is flat on the stone.
[3] Firmly push the blade upwards then lightly pull the blade back downwards. Use firm and smooth strokes for each movement.
Be sure to hold the blade at the same angle on every strokes. After about 3-5 stroke, move the blade slightly over and sharpen the next area of the blade. Repeat until the entire blade is sharpened.
[4] When done, there will be a rough edge (called the “burr”) on the backside of the blade that needs to be smoothed off. Turn the blade over and lay it flat on its cutting edge against the stone. Firmly push the blade upwards. Release pressure on the down stroke and continue for the entire length of the knife. See below for more details.
Sharpening Thin Japanese Style Blades (Yanagi, Takobiki, and Usuba Blades)
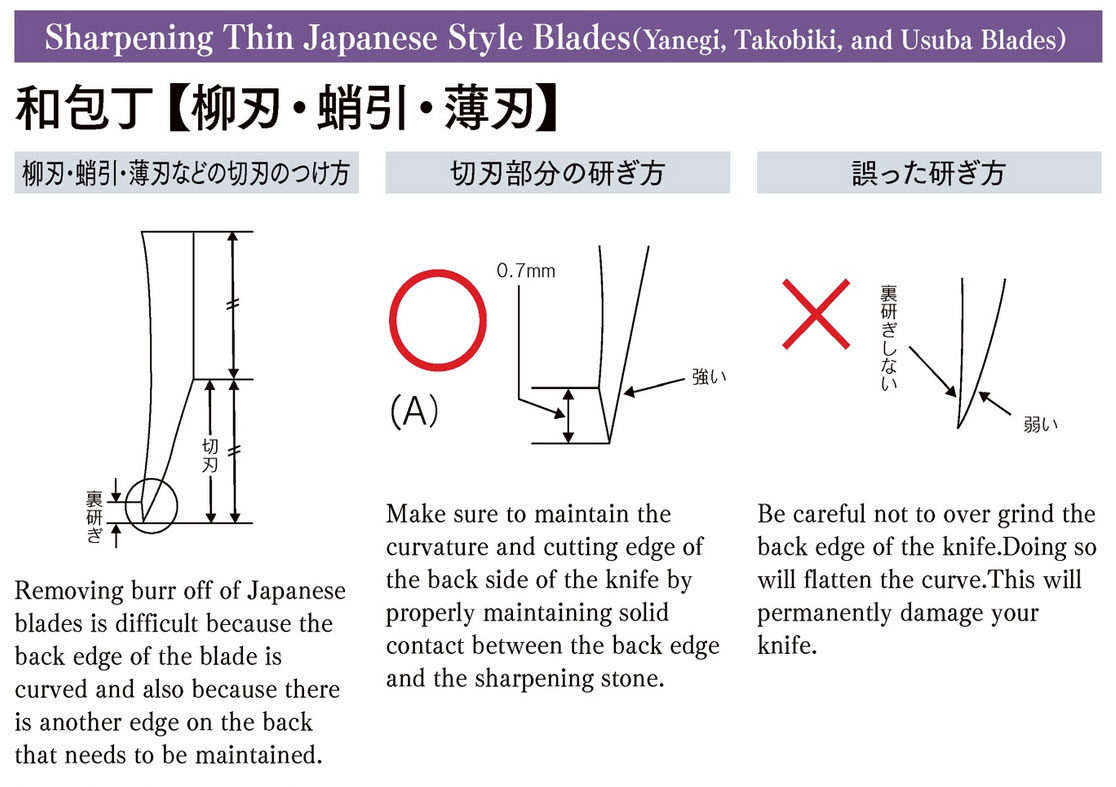
Removing burr off of Japanese blades is difficult because the back edge of the blade is curved and also because there is another edge on the back that needs to be maintained.
Correct
Make sure to maintain the curvature and cutting edge of the back side of the knife by properly maintaining solid contact between the back edge and the sharpening stone.
Not correct
Be careful not to over grind the back edge of the knife. Doing so will flatten the curve. This will permanently damage your knife.
Sharpening Thick Japanese Style knives (Deba and Yodeba blades)

For Deba
Deba and Yodeba blades are designed to cut thick foods (meat, bones, etc) and must be sharpened differently from Yanagi-like blades.
Correct
The cutting edge must be sharpened at a wider angle. Too thin of an angle (Like the Yanagi blades) will cause the blade edge to chip when cutting.
Things NEVER to do when Sharpening

DO NOT use hard cutting boards with Honyaki knives as this will dull or chip the blades very easily Always use soft cutting boards.
Do not lay the knife flat against the sharpening stone.
Laying a blade flat and sharpening both sides will permanently weaken the blade,causing it to bleak and chip easily.
Sharpening Western Style Knives
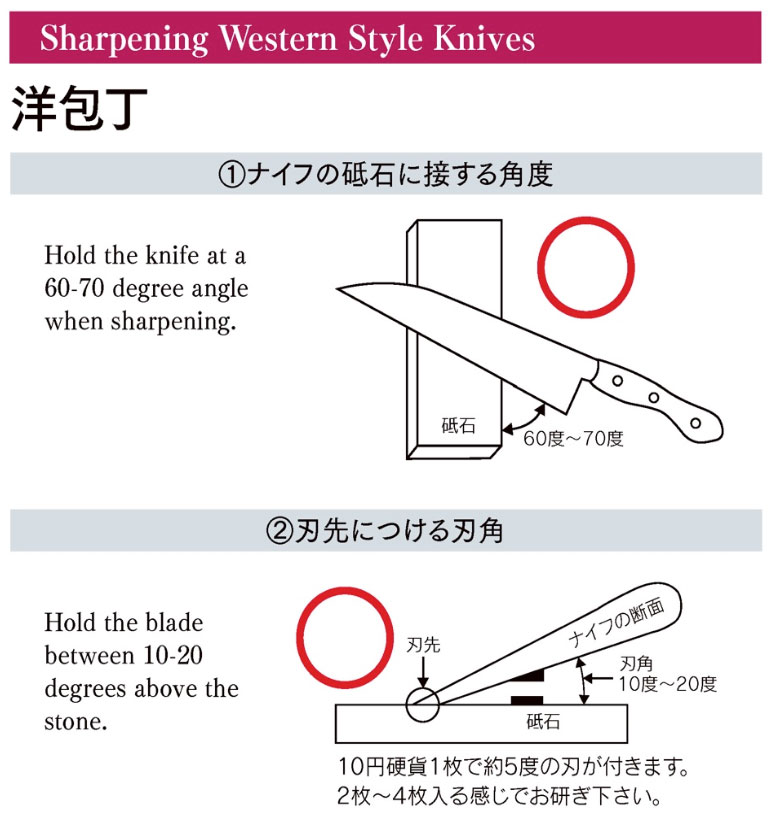
Top view:Hold the knife at a 60-70 degree angle when sharpening.
Side view:Hold the blade between 10-20 degrees above the stone.
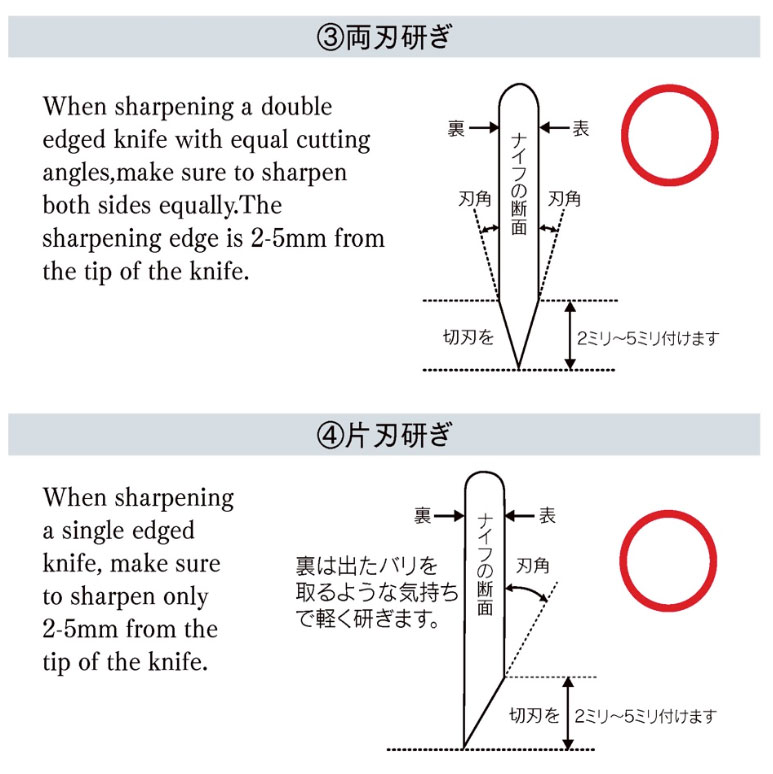
Double edge:When sharpening a double edged knife with equal cutting angles, make sure to sharpen both sides equally. The sharpening edge is 2-5mm from the tip of the knife.
Single edge:When sharpening a single edged knife, make sure to sharpen only 2-5mm from the tip of the knife.
How to change the handle (insert) of Japanese knife
The handle of the Japanese knife is all different, depending on the type and length. Depending on the manufacturer, there are some differences, but generally the length and thickness of the handle are determined by type and size. The size of the handle that matches the length of the kitchen knife is the most easy to use size.
There is also a difference in the shape of the handle. Generally, the delivery knife is an oval type. Other knives are made of chestnut. In the case of an oval type, the peak of the handle is larger in the peak. Also, in the case of chest type, please attach so that the person who is sharp pointed to the right hand comes to the right side.
Please check what kind of kitchen knife you are going to replace and how many centimeters it is and arrange the pattern that suits it.
It is a translation that has a pattern that matches this, such as six edges (180 mm), one ruler (300 mm) of ragged edges, 180 mm of nibbles.
In case of vegetable cutting knife, use it for thin blades. There are things that are cheap ones and so on, and there are things with a thin edge (1 mm) in thickness of the ridge, but the handle for this is not handled with us in the kitchen knife. We do stuffing and we will respond. Please note that there are west type and east type if not concerning the vegetarian knife.
The handle of the plastic handle (plastic ring) is very strong, but the more it becomes a high-grade pattern more than the buffalo pattern, it is delicate and easy to break. Just carefully, please be careful.
As for the standard of exchange, the plastic handle if the main body is less than 10,000 yen. If the main body is a knife with more than 10,000 yen, it is a buffalo pattern, if it is over 40,000 yen it is a feeling called ebony pattern. This is only a rough guide, if you attach a buffalo pattern or an ebony pattern even with a kitchen knife of 10,000 yen or less, the kitchen knife will rank up high-end.
First, a necessary tool in the case of replacing the handle.
1, Rugs are scattered so rugs. 2, the pedestal used for cracking (can be a block) 3, the lizard (eye for eye, blade for blade, wood for tree, hammer) Burner, gas table 6, wood work bond 7, spare handle or the same wood piece (used when removing the handle) 8, pattern matching size 9, newspaper, sand paper etc.
DIY! Please try hard. If you can not replace it by all means we can also exchange, so please feel free to send it.